
Sliders are versatile design tools that allow you to showcase your images, video and other content in an attractive way. They can help you quickly grab your visitors’ attention and share the most important content with them. Creating a slider for WordPress and Joomla platform is easy without coding knowledge, as there’s a wide range of slider plugins. But how about an HTML website?
I have good news, it is possible to create an HTML slider with an easy but amazing way: you can use Smart Slider 3. Smart Slider 3 is available in WordPress and Joomla platform, but it doesn’t mean that you can’t use it on your HTML page. You can export the codes of the slider what you have created, and you can use it on your page.
How to create a HTML slider without code?
- Install WordPress or Joomla on localhost
- Install Smart Slider 3
- Create your HTML slider or import one from the Template Library
- Customize your slider
- Export it as HTML
- Use the codes on your website
1. Install WordPress or Joomla on localhost
For creating a HTML slider you will need a WordPress or Joomla platform which you can install on localhost. Smart Slider 3 works on these 2 platforms, but you can use your ready slider on your HTML website without these CMS.
Working on localhost can be useful because you can try what you have created. And if you have purchased the Pro version of Smart Slider 3, and installed it on local or you work on a development domain, it does not count as separate license usage.
2. Install Smart Slider 3
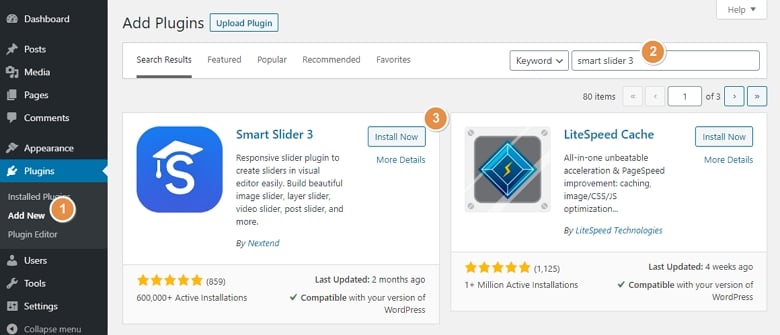
After you have installed WordPress on local, you can install Smart Slider 3. For installing the free version you can go to your Plugin list, click on Add new and search for Smart Slider 3.
Another option is that you can directly download the free version from the Smart Slider 3 website – or if you have purchased the Pro, from the download area – and then you can upload it with FTP.
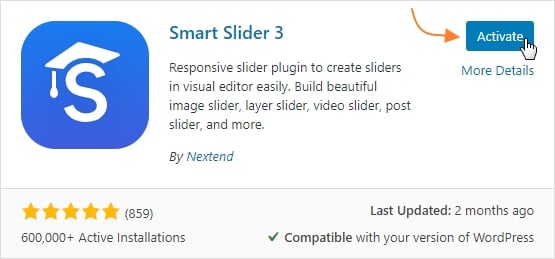
After you have installed Smart Slider 3, you should activate it by clicking on the Activate button.
3. Create your HTML slider or import one from the Template Library
In Smart Slider 3 you can import a template from the Template Library, where there is a huge collection of professionally designed slider templates which you can fully customize. You can import from a lot of slider types, such as full page slider or full width slider, and you can import even a WordPress carousel where you can show more slides at the same time.

If you have a unique design idea, you can start from an empty slide and use layers, set a background image, or create a video slider. It only depends on what you create, but building a slider with Smart Slider 3 is fun.
4. Customize your slider
If you have created your slider or imported one from the Template Library, you can fully customize your HTML slider. In Smart Slider 3 you can easily create a layer slider, just drag and drop the layers, what you want, and customize it. You can change the colors, sizes, and you can position the layers. In the Pro version of Smart Slider 3, you can use layer animations which help catch and keep the visitors’ attention for as long as possible.
5. Export it as HTML
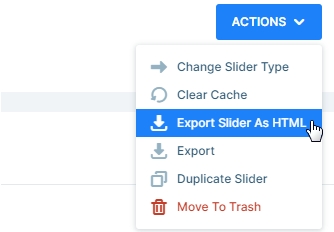
If your slider is ready, you can export it as HTML. This option will put all the contents of your HTML slider into a zip file.
🎓 You can use this option in the free version of Smart Slider 3 as well.
6. Use the codes on your website
The first things you will need are the folders and files inside the exported folder, so you should copy them into your website’s files.

Then open the exported index.html file, and copy the JavaScript, CSS and Google font codes. They start under the <title> tag, an end before the </head> tag. Copy that code, go to your website’s files, look for the <head></head> part, and insert the copied code right in front of the </head>.

The sliders’ code begins after the body and ends before the closing body. You can copy and paste that code to your site where you want the slider to appear. And that’s all, you can save your file, and check out your slider. If you’re wondering about browser support, you may rest assured that Smart Slider 3 works fine in all major browsers.
Why to use Smart Slider 3 on your HTML website?
- You can save time. Creating a slider without code can save a lot of time. You can visually create your slider and just copy and paste the code of the slider.
- Easy to use. Build up your slider by dragging & dropping your layers.
- SEO friendly. You can use the alt tag on your images, and the search engines will find the text on your slider as well.
- Extensive slider library. You can choose from a lot of predefined sliders which you can fully customize. Just pick one, import it, and change what you want.
- Fully responsive. With Smart Slider 3’s responsive slider settings you can create your slider to look good on every device.
- Useful features. Use the Ken Burns effect, or the shape divider with a few clicks. Or build a special animation visually with layer animations.