Whether it is to add new functionalities to your site, or to improve WordPress security, or to improve website speed, WordPress updates are an absolute must-have in your website maintenance strategy. And yet, most website owners fail to do this. If it’s only a matter of clicking the ‘Update Now’ button and most updates are free, why do website owners worry about WordPress updates? That’s because WordPress updates when not done right can cause your site to break or crash.
Does that mean you don’t update your site and its components? Of course not. All you need to do is tick a few items off a checklist before you update.
What is this checklist and how do you know what to do before updating WordPress?
This article shares a must-have 7-step checklist you can use to update your WordPress site.
Checklist: Things to do before updating WordPress
A rushed update — regardless of how important it is — is a recipe for disaster. A broken website undoes all your effort so far and means additional hours wasted in restoring your site.
To avoid such complications, here are 7 things to do before updating the WordPress site:
1. Test your live website before updating
It may seem strange to test a live and functional website, but it is necessary to do so before making a major update. Why is this step required? After an update, you may notice a broken functionality or design feature on your site. The reality could be that this problem may not be related to the update and could have been present before the applied update. Checking the website will help you troubleshoot the problem quickly and accurately, instead of guessing if it was the update that “broke” your website.

Check if all your web pages are loading properly and you can enter comments, send and receive emails, and fill other online forms on your website. If you detect any functionality issues, then this is the best time to fix them before applying the update.
2. Back up your WordPress site
Now that you know that your site is working fine, make sure you take a complete backup of your WordPress site. Why are backups so important? In case your updates end up crashing your live website, you can quickly restore it using the latest backup files. Depending on your needs and the activity on your website, take a backup every week, day, hour, or even on a real-time basis. Whatever the frequency of regular backups, make sure that you do one before every update.
In addition to your website files and folders, don’t forget to back up the WordPress database. Regular database backups ensure that you do not miss any customer data records or a single user comment added to your site.
To make backups easier and faster, you can use a backup plugin like BlogVault that offers unlimited on-demand backup in addition to scheduled and automated backups. It handles backups for both your website files and database records and has a one-click restore functionality that can retrieve the latest backup file and restore your website when needed.
3. Check new update details
Before performing any updates, check the details of the new version. For example, if you are updating a plugin to the next major version (for instance, version 2.x to 4.x), check their release notes for any compatibility issues.
The same goes for the Core WordPress, plugins, and WordPress themes.
Similarly, check if the latest plugin/theme version has gone through a major enhancement or changes. This may cause a major change in your website functionality causing it to break or crash. In this case, you are better off holding on to the update until the new version has been thoroughly tested and found to be stable.
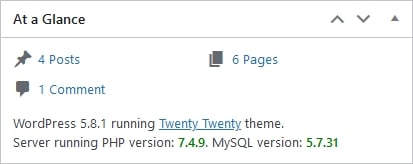
4. Check the PHP version
Every WordPress site runs on PHP software that needs to also be regularly updated to improve website performance. You need to check the PHP version that your hosting is currently using. Also, check if the updated WordPress version is compatible with your current PHP version – without which your site is likely to report incompatibility-related problems and can even crash.
How do you check the PHP version? From your WordPress hosting account, you need to navigate to cPanel >> Select PHP version. Alternatively, you can check your PHP version by installing the “Display PHP Version” plugin from the official WordPress repository.
5. Disable caching
You may not be able to see the new features or changes on your site even after a major version update. This occurs typically when you do not clear your website cache before applying the update. Hence, it is recommended that you clear your existing cache and disable the caching mechanism to observe the website changes immediately.
If you are already using a WordPress caching plugin, make sure to deactivate the plugin before the update process. This ensures that it will not interfere with the update process. At the same time, remember to reactivate the caching plugin after you have completed the updates.
6. Create a staging site
Always look to apply WordPress updates in such a way that your live site and its visitors are not affected in any way. The best way to do this is through a staging website.
A staging site is a replica of your live website and is completely independent of the main site. This means you can make and test any changes on the staging site with zero impact on the live site. Once you have tested and are satisfied that the applied updates are not breaking your site, you can then choose to merge the updates to the live website.

How can you create such a staging environment?
One option is to install a WordPress staging plugin like WP Staging or WP Stagecoach. If you do not want to invest in a separate plugin just for staging, then you can use the inbuilt staging feature that backup plugins like BlogVault offer. Since BlogVault creates and runs the staging site on its dedicated server, there is no load on your web server and no impact on your website speed.
7. Review and update plugins and themes
It is not simply enough to update your core WordPress version, you also need to update each of your plugins and themes. This is because outdated plugins/themes may cause incompatibility issues with the latest WordPress version. Before applying updates, make sure they are both compatible with each other.

Before you can update plugins/themes before WordPress, make sure to take a complete website backup to revert to their older versions in case the update process fails.
If you have installed hundreds of plugins/themes on your website, you can review and update all of them with a single click by using a WordPress management plugin like ManageWP.
Final Thoughts
Once you have completed this 7-step checklist, you can go ahead and enjoy the enhanced functionality and security that the latest WordPress versions have to offer. This is also a good time to take a fresh backup of your WordPress website and database.
We hope this handy checklist helps you take the unpredictability out of WordPress updates and make managing your WordPress website smoother and simpler.
This is a post, created in collaboration with Akshat Choudhary, who is the CEO of BlogVault.